There are many things to take into consideration when making training content accessible. Some examples are color choice for contrast, size of elements, simple writing, and more.
We put together a post with more details on all the ways to make Word documents accessible, which also includes a free downloadable checklist, so you should check that out, too.
But this is all about adding alternate text to Word and Google Docs, one of the easiest things you can do to make documents more accessible. Alternate text is commonly known as alt text.
Alt text is essentially a description of an image that screen readers will read. Alt text is also typically available when images are turned off or can’t load for whatever reason (images turned off or broken reference).
Training content should be accessible to everyone, so it’s important to understand as many accessibility considerations as possible so you can account for them in designs. Alt text is one element and a great place to start getting into the habit of adding accessible features to your training content.
Training content should always be made accessible which offers benefits to everyone, not just those with disabilities.
For any written documents you produce for training, if images are relevant to learning, alt text should be provided. If an image is for decorative purposes, don’t provide alt text. There’s no purpose for a screen reader to read what a decorative image is because it takes away from the important content or could make the content more confusing.
Microsoft Word offers the option to mark an image as decorative only. That’s helpful because screen readers skip over images with no alt text or marked as decoration entirely. It’s best to mark them decorative rather than blank, though.
Before I get into the details of adding alt text to your document images, there are other accessibility considerations. Let’s take a quick detour because these are important to know.
Other Considerations for Document Accessibility
Beyond the obvious features that a lot of software contains for accessibility, there are things you must take into account yourself. That’s because they’re not features but simply mindful designs for accessibility.
These are some potential types of disabilities that must be considered when making training documents accessible.
- Color blindness
- Low or no sight
- Cognitive abilities
- Physical or motor difficulties
- Etc.
The list can go on, but there are some simple steps you can take to make training content more accessible to everyone. These steps generally apply to digital training such as eLearning and videos, but some can be applied to in-person training, performance support, or other methods.
Here’s what you can do to accommodate accessible needs and help others who don’t necessarily require accessible content but will benefit from it.
- Write simple.
- Use good contrast between colors.
- Don’t put (many) words in images.
- Do the squint test (squint your eyes very small to check if things are readable).
- Make text big enough.
- Make buttons and links descriptive, large, and easy to click.
- Use tab order.
- Include subtitles in videos.
Adding alt text to performance support (job aids, quick reference guides, etc.) is a great way to assist people with screen reading technology. Alternate (alt) text can be read by screen-reading technology in the place of an image.
The best part? When you export alt text in either Microsoft Word or Google Docs to PDF, the alt text will still be included for screen readers.
One last note on accessibility in Microsoft Word in general: Microsoft provides a handy tool for all their Office applications that lets you check if your Office content is accessible. It also gives you handy tips for fixing non-accessible content.
Add Alt Text in Microsoft Word
Adding or editing alt text in Microsoft Word images is fairly straightforward. If you used a stock image from Word, then the image comes with some basic alt text. It’s not usually very good, though.
Also, if you’d rather watch a video on this topic, check out the video we put together about making Word documents more accessible.
Here’s how you add and edit alt text In Microsoft Word.
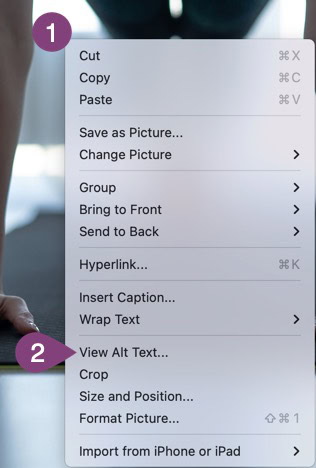
Step 1: Right-click on an image or object (yes, you can add alt text to objects too).

Step 2: Click on View Alt Text…
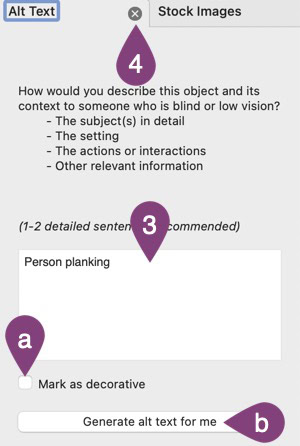
Step 3: Edit or type in alt text that describes your image well but is less than 250 characters.
Don’t write person. A better alt text would be a person planking next to a stream on a fall day. Whatever can help someone understand your content better without seeing it.
Step 4: Click the X button on the Alt Text tab to close it.

Option a: If a graphic is decorative and serves no functional purpose in your document, select this box so no alt text is included, and screen readers will skip the image.
Option b: This button can sometimes read a picture and generate alt text for you. It’s probably a good idea not to rely on this feature, but it’s there if you do want to try it to start your tag so you can edit it or write more.
That’s it! Now you can go through all your graphics and put alt text in them so they’re accessible to a broader audience.
You can also use these instructions to add alt text to other Microsoft Office applications such as PowerPoint or Excel.
Add Alt Text in Google Docs
Similar to adding alt text in Microsoft Word, you can also do it in Google Docs. These steps will help you add alt text to any image.
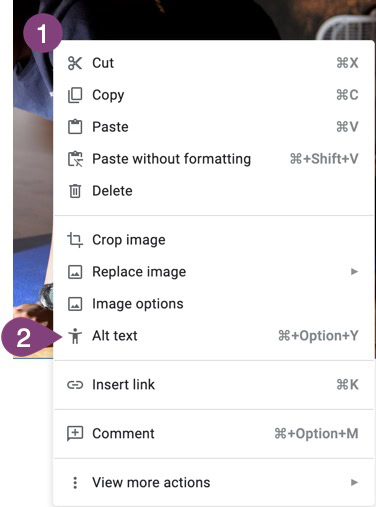
Step 1: Right-click on an image.
Step 2: Click on Alt text.

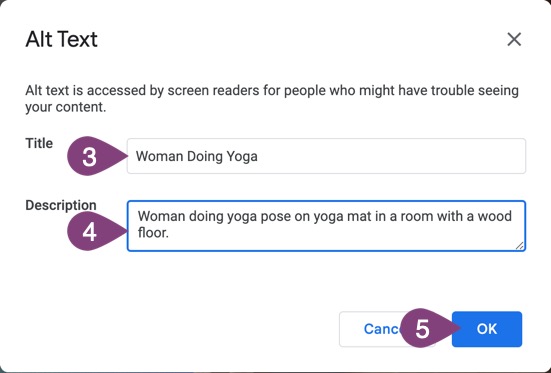
Step 3: Type in a title for the image if it’s helpful, or leave it blank if you have no title.
Step 4: Type in a more thorough description of the image that’s not more than 250 characters.

Step 5: Click OK.
That’s it! Now alt text is added to your Google Doc image, and you can continue doing it for other images. You can also use these steps for other Google applications like Slides and Sheets. It works the same way.
Wrap Up
Making training content accessible is not only the right thing to do, but for many companies, it’s a legal issue, too. Not making content accessible to employees can open companies to discrimination or other lawsuits.
Similar to it being the law that buildings must be physically accessible, content (including training) must be accessible to everyone. With some simple steps, training content can be made more accessible to everyone.
When training content isn’t accessible, organizations risk exposing themselves to lawsuits.
Many authoring tools such as Storyline, Camtasia, and Microsoft Word have many tools built in for accessibility. It’s up to you to use them to make all training content more accessible. We also put together an easy-to-follow post about making eLearning content accessible, which mostly focuses on Articulate Storyline but can also be used for Adobe Captivate or your preferred rapid eLearning development tool.
Now you know how to include one important accessibility feature when using tools like Microsoft Word or Google Docs to design job aids, quick reference guides, or other training documents. Whenever we use these tools to develop performance support, we also include important alt text in documents.
If you’re ready to work with a digital training company that knows the importance of accessibility in training, we’d love to discuss helping you with training for your next technical project.
