Since you’re reading this, you likely know the importance of subtitles in your training videos. If not, check out our last post about how subtitles benefit everyone. This post is about creating subtitles for training videos and importing them to the most common video hosting platforms.
So, here I am with another post with specific ways you can create subtitles for your training videos. There are as many ways to do it as applications to make videos. This article sticks to a few common methods in common apps for developing training videos.
You’ll find specific information about creating subtitles in Camtasia and how to take a current video developed in any application and easily create subtitles to load them into any video hosting platform.
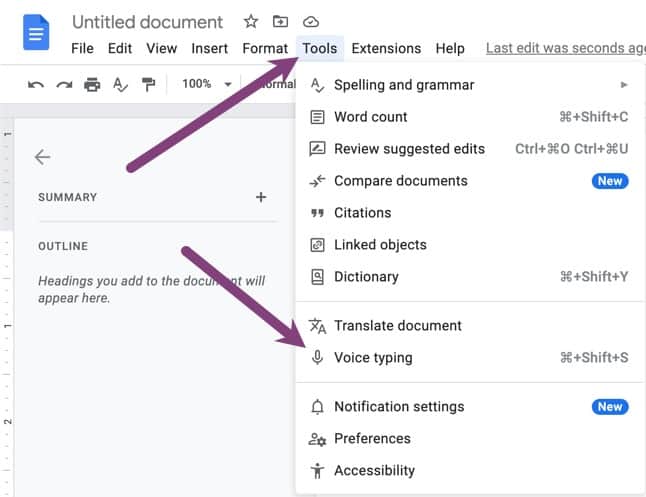
I’ve read some pretty creative ways to transcribe audio from a video. One of my favorites was using the Google voice typing features and then playing the video for it to transcribe.
The big problem is that subtitle files for video hosting have a lot more info than just a transcription. They have start/end timestamps and caption numbers, and they’re specifically formatted.
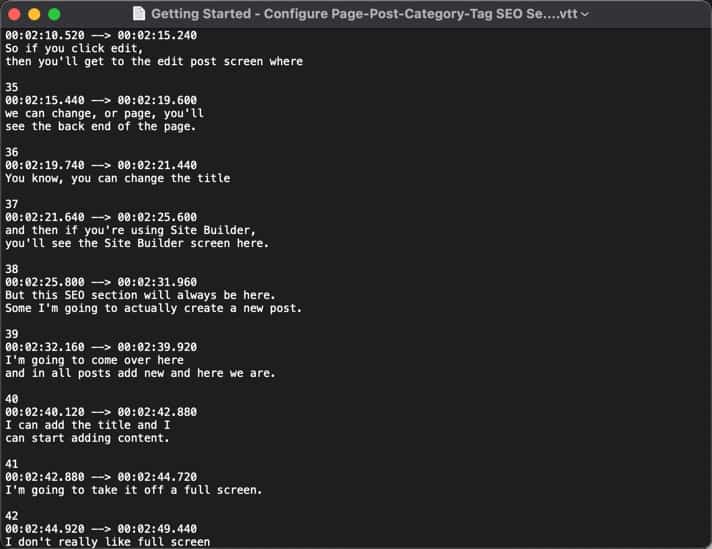
They’re pretty complex for something seemingly simple and can be huge and unwieldy files to manage. So, I’ll give you some suggestions for tools to make it easier if the video editing tool you’re using doesn’t let you create subtitles natively.
How To Subtitle Videos
The most convenient way to create a subtitle file is to make them natively in the application you use to edit your video. Camtasia is one of the most common apps we use to develop training videos. It has amazing tools built in that you can create subtitles and export a subtitle file that most (if not all) video hosting platforms will accept.
Dozens of transcription tools will take a video or audio file, automatically transcribe it, let you review and edit the transcription manually, and then export the file in various formats.
Then there’s YouTube, which autogenerates captions for videos. That is never something you should rely on as your only method of captions, but it’s a decent start. You’ll want to go into the YouTube settings, copy the autogenerated captions, go through the entire thing, and modify them. They’re pretty shotty if you’ve ever used them, especially if you recorded non-scripted.
Let’s get started with creating a transcription file right in Camtasia.
In A Video Editing Program
Every video editing program is different for creating subtitles, but they all work similarly. For this example, I’m using Camtasia 2022 for Mac. Remember that even the Windows and Mac versions of Camtasia slightly differ in how you create the subtitles. Exporting should be close to the same, though.
Once you have your Camtasia file open with an audio track, you can follow these instructions for putting the subtitles in Camtasia. All the timing and different subtitle boxes are contained and managed in Camtasia. Then, you can export in your chosen format and import it into any video hosting platform. Once uploaded, your video will have subtitles that viewers can control natively on the video platform.
Here’s how you do it.
Step 1: Click the Audio Effects tab.
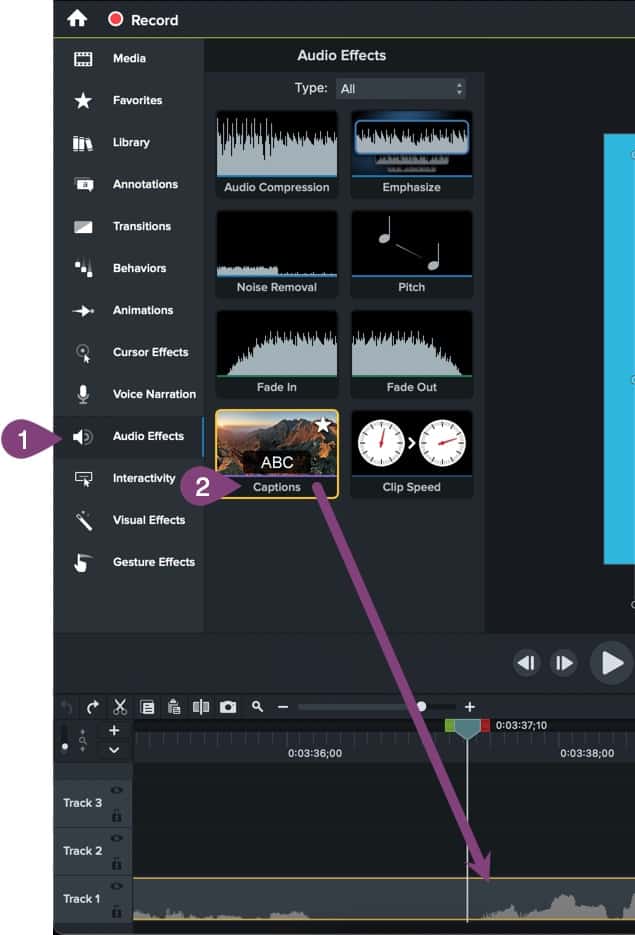
Step 2: Drag the Captions block onto your audio track. Remember that Camtasia calls it captions, but it’s also applicable to subtitles, which are just captions with slightly less information (no audio, sound fx, etc.).
A new track will be added to your Camtasia tracks just for subtitles. You can always enable the captions track by going to View > Show Caption Track (maybe different on Windows).
Once you drag Captions on the audio track, you’ll get a special waveform in the captions track, and Camtasia will guess how long to create each caption. That’s very handy because it makes relatively short sections, and each subtitle should be small or not easy to read. It’s also nice because you can adjust the timing of each one.
Step 3: Click on any of the pre-created subtitles.

Step 4: Adjust the size of the caption/subtitle by clicking on either the left or right side and dragging left or right so you get all the audio for that subtitle. This is what creates the right timing that will be in the timestamps of the caption file.
Step 5: Type in or paste the text for that audio section. Since most of our content is scripted, we copy/paste from our script. You can even use the play icon on the subtitle box to repeat that subtitle audio over and over if you’re typing it in as you’re listening. The right and left buttons let you skip to the next or previous caption box.
Option a: Use these tools to split the current caption, merge it with the next, and other options to adjust it.
Option b: These lines show you where each subtitle is. Camtasia will put a whole bunch in for you based on the audio, so start with those and adjust them as needed.
Keep working through each subtitle and use the arrows to jump from one to another until you finish quickly. Camtasia allows you to publish a file with the video and subtitles in the player, but that’s not a good way to do videos. Hosting them on a dedicated video hosting platform like Vimeo or YouTube is always best.
That means you should export a standalone video file (mp4) and then export the subtitle/caption file separately. That’s what’s up next!
Once you’ve finished all your caption text in Camtasia, it’s time to export it to a file format that your chosen video hosting platform will accept.
Step 6: Click File.
Step 7: Hover the cursor over Export.
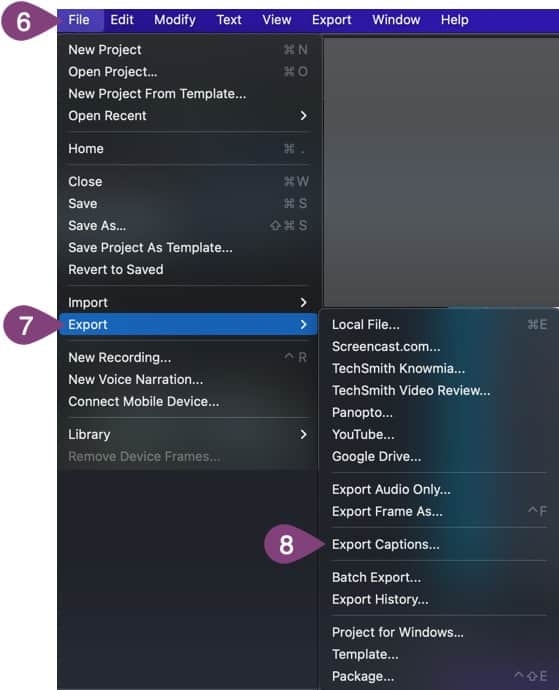
Step 8: Click Export Captions…
Step 9: Name the caption file something you’ll remember and put it somewhere you can find it.
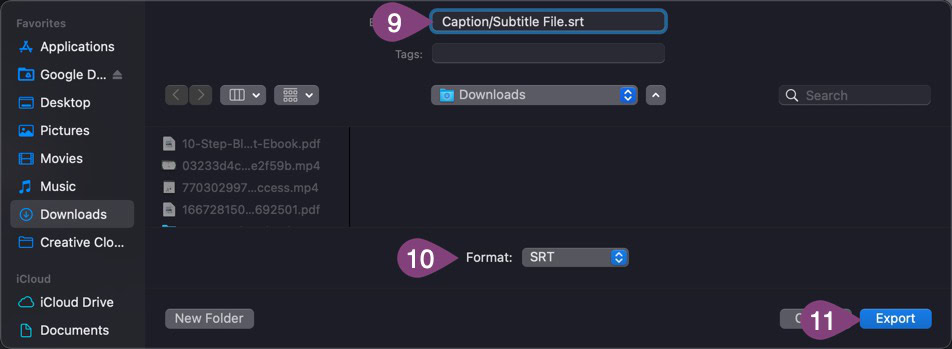
Step 10: Choose the caption format.
With Camtasia, you only have the option of SRT or SAMI for caption export. Luckily, YouTube supports both of these, and SRT is very common. You can find a list of all the caption files YouTube supports here, and if you’re using Vimeo, those are here (hint: just use SRT). If you search for supported caption files for any video hosting platform, you’ll find out what file type you should use for export.
Here’s what an SRT file looks like:

It’s a pretty simple format. Unless you have something extremely complex in your caption file (doubtful), then SRT will suffice.
Creating the caption file in Camtasia is a pretty manual process. Even using a script it’s a lot of work copying and pasting. But it’s precise.
There are faster ways to speed up the transcription process, especially if the video wasn’t done with a tool that gives you control of captions.
Perhaps you did a quick screen recording and didn’t have a script. Up next is how we deal with times like that.
Online Transcription Tool
Sometimes, you don’t have the video in an editing program like Camtasia or don’t want to do it manually. It can take a long time. There are plenty of tools that can automate the process for you. That’s how we speed up the transcription process to get a nice subtitle file to upload into our video hosting platform.
We use a tool called Happy Scribe to do automated transcriptions. Many tools are out there, so feel free to use the one you find the most useful. Some services will transcribe audio for you manually, which Happy Scribe can also do for a fee.
Here’s how the tool we use works. You drop in your audio or video file (step 1 below). We try to upload just the audio file because the file is smaller and quicker to upload. It also accepts video files, though you can see the video as you go through the transcription.
Next, you choose your language and set up your vocabulary for special pronunciations (think company name) in step 2.
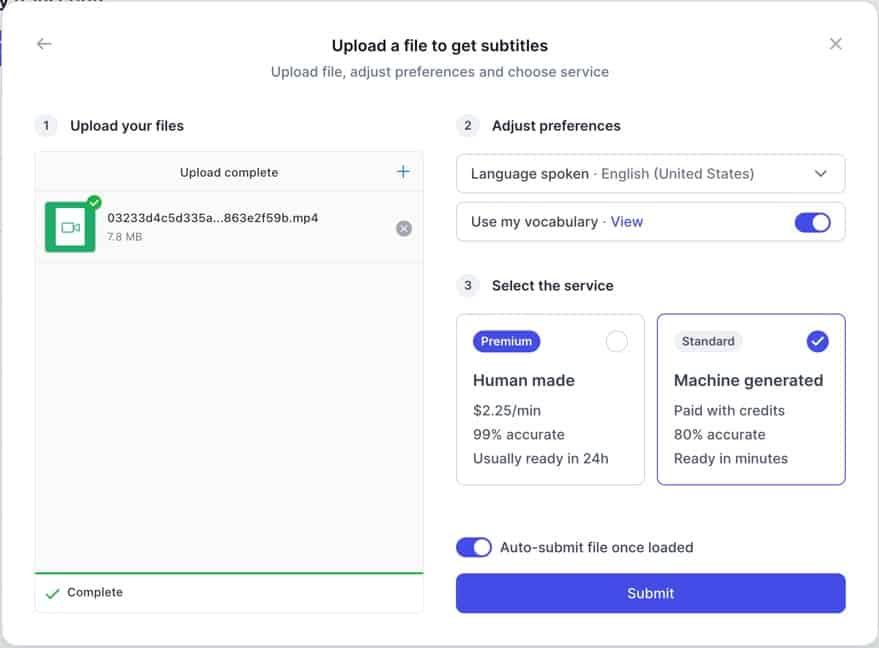
We always use machine-generated subtitles in step 3 because most of our stuff is scripted, which means the automated method is pretty accurate. If you recorded off the cuff, you might have a lot of ums, creating more work for you in this process.
We also like to auto-submit the file once it’s loaded and then submit it for transcription.
After it runs through the process, you get a screen that looks like this.
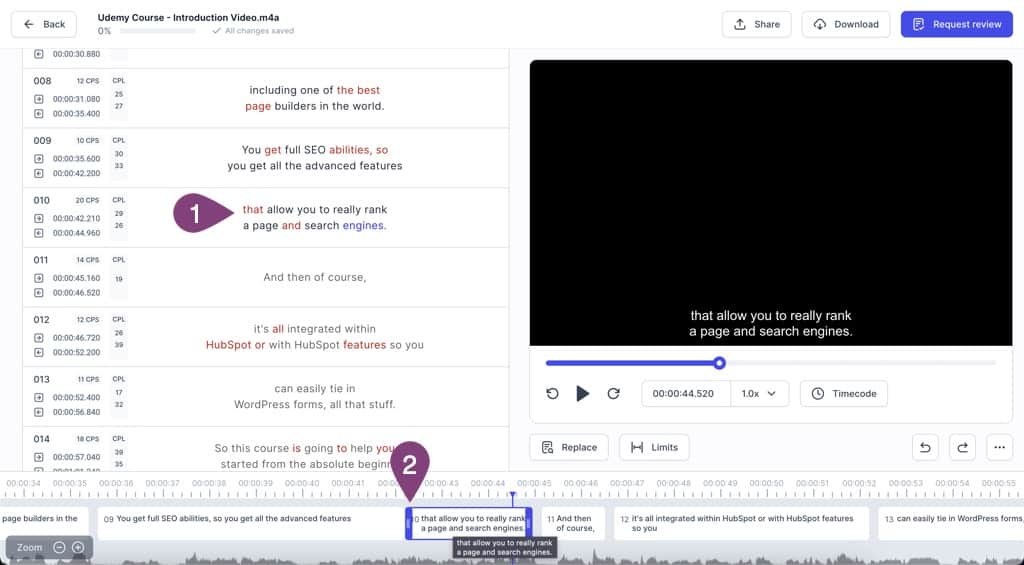
In step 1 (above), you can click right in those boxes and edit the text as it begins playing automatically. Step 2 shows where you can click on any text boxes and drag them left or right to adjust where they start and end in the audio timeline.
If one subtitle box has too much text, the tool shows you by highlighting either the CPS or CPL boxes in red. That means you need to shorten it up because people can’t read that fast.

Once you’re done, you get to click the download button and choose the subtitle format you’d like to export. Happy Scribe supports many different file formats, which is handy.
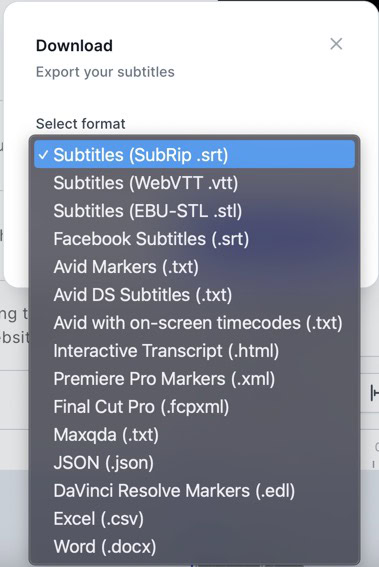
Once you have your subtitle file, it’s time to upload it to your favorite video hosting platform.
Import Subtitles into Video Hosting Platform
Any good video hosting platform supports many caption/subtitle file formats. YouTube supports a ton of different formats, and Vimeo does also (SRT, WebVTT, DFXP/TTML, SCC, and SAMI). The most common format that you’ll use is the SRT format. It’s sufficient for most uses, and there likely won’t be much need to use anything else.
Let’s get those caption files onto your favorite platform!
Into YouTube
Whether you’re uploading a new video or your video is already on YouTube, it doesn’t matter. You can always add captions/subtitles later to a video that’s been available for decades.
Here’s how.
Go into the edit screen of your video and then follow these steps to add the caption file you created.
Step 1: Click Subtitles.
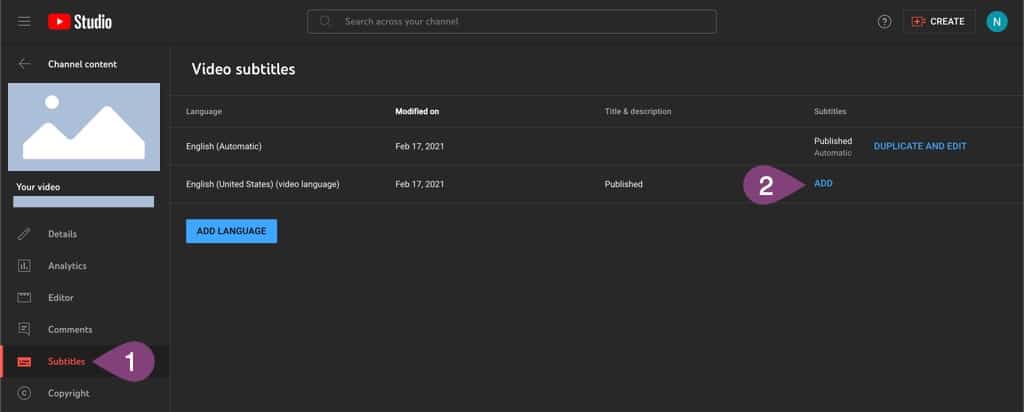
Step 2: Click the ADD link next to the language your video is in (or add a language). This is likely the default language of your YouTube channel. If you haven’t selected a default, you must do that first.
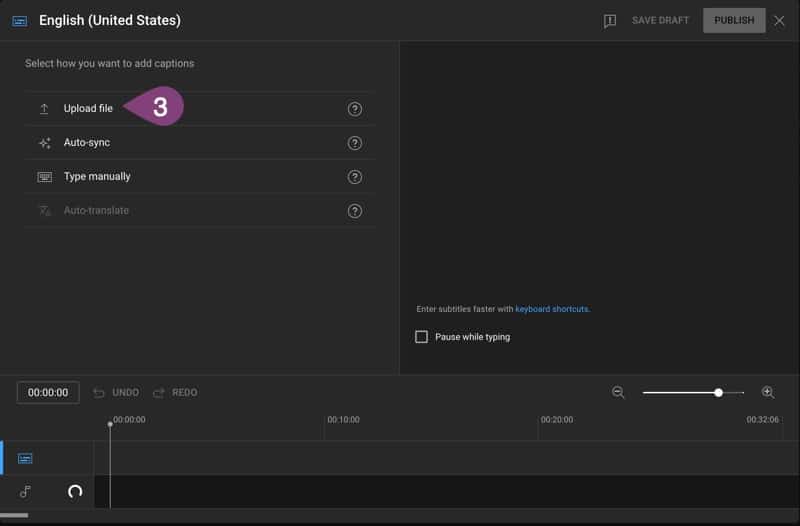
Step 3: Choose the Upload file option because you have a caption file all ready to go.
Step 4: Leave it on With timing because your subtitle file already has all the timings of each caption box.
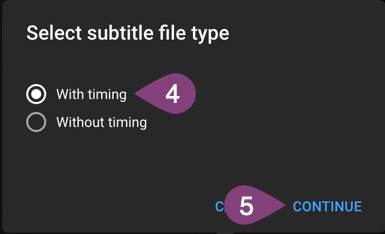
Step 5: Click Continue.
This is where you’ll get a dialogue to choose your caption/subtitle file type. If you chose SRT, grab that file and upload it. Once uploaded, you’ll see the screen below, but with a huge list of all your subtitles and the start/end times for each one.
It’s as easy as that once you’ve done the hard work in your video editing software or transcription software. Everything’s done for you on YouTube or any other video hosting platform on which you want to use the video file.
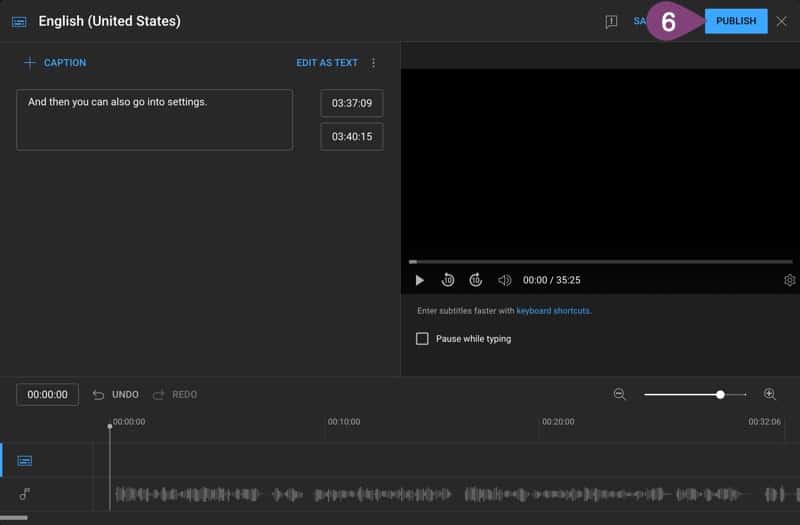
Step 6: Click the Publish button.

That’s it! You can now see your subtitles for English (or your default language) in your video. You can also add other languages if you have translated your video and have a file for that language.
YouTube also creates automatically transcribed subtitles, but they aren’t great, and their tool is a little funky. Providing your file means you can conveniently upload your video and subtitles anywhere you’d like.
Into Vimeo
Uploading your SRT file to Vimeo can be shown in one screenshot. You just need to edit your video and then follow these steps.
Step 1: Click the CC button on the editor sidebar.
Step 2: Click the Settings tab.
Step 3: Click the + icon.
Step 4: Select your caption file to upload it.
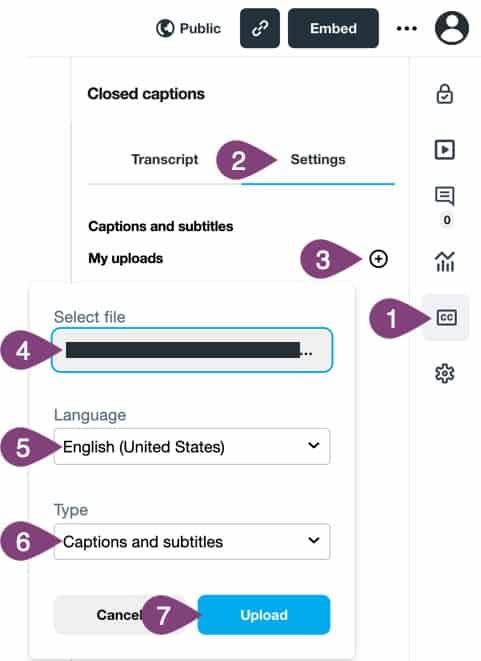
Step 5: Choose your subtitle file language.
Step 6: Choose an option for Type (not sure it matters which one you choose).
Step 7: Click Upload.
Step 8: Toggle your subtitle file on next to the file you just uploaded.
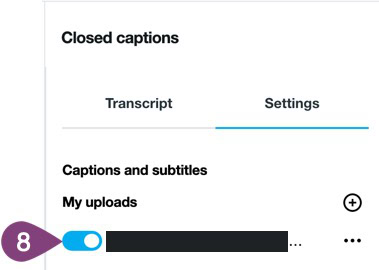
That’s all you have to do with Vimeo, and your video will now have a cc icon when it is played to allow viewers to use closed captions.
Wrap Up
Good job making your video more accessible to everyone!
Every tool where you can create a video is unique. This only covers Camtasia, but each application has its way of doing it. The most tool-agnostic method is to use a transcription tool to create a subtitle file for you.
If you’re looking to do it on the cheap, YouTube has the tools you need to do it all manually or even work off their autogenerated subtitles. So, you get free video hosting and free transcription services. It just requires a bit more work on your part.
Whatever you choose, you provide the world with a good service by providing subtitles for your training videos. Our specialty is developing training for technical projects, but this process can work for any presentation with spoken audio.
If you need better technical project training, we’re here to help you develop world-class corporate technical training.
